Hi guys, long time no write! My life’s been crazy lately, as my preparations for the wedding entered the most time-consuming part (and one of the nicest) – invitations! Hopefully soon everything will calm down and I’ll have more time for cozy coding…
In the next post I’d like to show you my favorite node scheduler. It uses MongoDB as storage, so today we’re gonna create some basic, testing instance. This is not supposed to be a post about MongoDB. There are some controversies around this database, mainly connected with its saving mode, which is fast but do not signalize problems with the save. So there is a possibility of losing some data when using this mode. I’m by no means an expert in databases, but I can tell you one thing – I love documents instead of rows of table and I love how nicely this allows me to model my data. I’ve been using Mongo on production for over a year and you know what? I’m a crappy db admin but it just have been working constantly for this whole year, zero downtime, zero problems. This is just my experience of course, but I’m not here to convince you that it’s the best DB in the world, because it isn’t. It’s perfect for storing scheduler jobs though… ;)
Obviously we could set up a basic Mongo installation, but for such tiny, fast proof of concepts I prefer using the free cloud solutions. =) That is why there is MongoLab (mlab now, I guess) in the title of this post. It is a MongoDB hosting and management portal, which offers includes free 500 MB Mongo instances for free, without any limitations or expiration. Of course, it’s installed on a shared virtual machine, so it is not as fast as paid plans, but for simple projects it’s really good. And 500 MB for a Mongo database is a pretty big storage. :) So let’s start with creating an mlab account. The account you’re about to create is a company account, which means that you’ll be able to add other people and create their user accounts. After filling the form and veryfing your email you’ll be redirected to the dashboard, when you can create new databases.
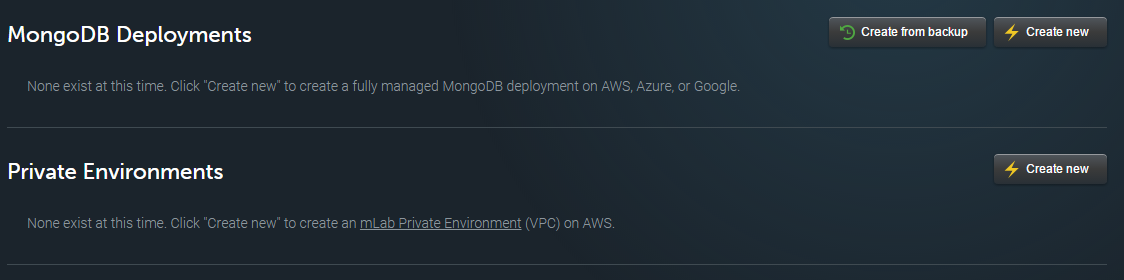
Click the “Create new” button in the MongoDB Deployments section. You’ll see some options for your new db. Firstly choose the cloud provider – this is where mlab will provision the virtual machine for your database. For me it doesn’t really matter as I’ll host my server on RaspberryPi, but if you’r planning on connecting with the db from a server in the cloud, choose your provider and region for cheaper data transfer and lower latencies.
Below you’ll find many pricing options, To find the free one, you need to choose the “Single-node” category” and then select “sandbox”. In this option you cannot change the MongoDB version, so the last thing to set up is writing the database name. When you’re ready, click the last button. After a few seconds our brand new db is up and running, but it’s not yet ready to be used. We need to create some users that will be able to connect with the database.

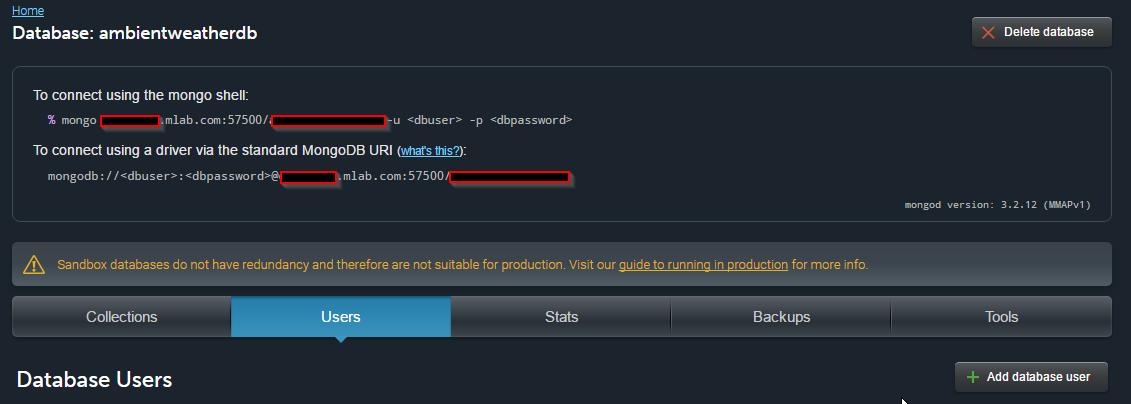
Click your db name. You’ll see a neat db manager. From here you can do whatever you want with your database – create collections, insert documents or even delete it. Firstly, we’ll be interested in the “Users” tab. Click the button “Add database user”. Fill the short form, remember to create a strong password – the best would be a randomly generated string. When user is created, you can also create a read-only one, in case you didn’t want some process to be able to change any data. Now we’re ready to test our connection.
For connecting to database and running some scripts or test queries I really love using Robomongo. It’s a great tool, which greatest benefit is integrated mongo shell, which makes experimenting with queries and script really convenient. It also allows you to do many management jobs with the database, such as exporting, importing collections or setting up indexes. Oh and it’s also open source. :)
Download the application and run it. You’ll see an empty connections window, so click the “Create” word. The first tab is the Connection tab. Name you connection so that you’ll be able to quickly locate it in the list in the future. Db address and port can be found on that management page on mlab.com.
Next click the “Authentication” tab. Mark the check box “Perform authentication”. As the database enter your database name (usually there is a separate database just for storing user credentials, but not in this case). Enter your user credentials and click “Test”. You should see two green ticks which mean that you’re ready to successfully connect with your database. Click “Save”. You’ll see your new connection on the list, so click the “Connect” button.
On the left you can browse your database. Right now there are no collections, but you can play with the database by right-clicking on the Collections category and choosing “Create collection”. Name it and accept. Now expand the Collections category and click your new collection twice. In MongoDB collections are the same thing as SQL’s tables and contain documents (as Mongo is a document db). You’ll see that Robomongo created a find query for you. In the shell window you can use javascript for writing scripts, so fell free to play with it. For example, simple script for inserting five test documents could look like that:
    var coll =  db.getCollection('Test');
    for(var i = 0; i < 5; i++) {
        var testDoc = {
            TestId: i,
            Name: "Test" + i
        };
        coll.save(testDoc);
    }
Click the green arrow or hit F5 to run the command. You’ll see the info that documents were inserted. Now if you click twice your collection, new tab will open and you’ll be able to browse your fresh new documents. It’s all that great? :D
And as always - like my fan page or follow me on Twitter to get notified when future posts appear. (。◕‿◕。)
comments powered by Disqus